Ok….I apologize. I know many of you might not have noticed, but this recipe was supposed to be posted a long time back. Back when this recipe was uploaded on the Ricesome pages. But, I didn’t. Why? Well, it’s like this. I test recipes before I post them, as any good cook/responsible internet citizen would do. This is because: A.) It makes the filming process easier and more in control; B.) I have to work out any issues in the recipe itself and resolve them. This process requires me to do it 2-3 times…………or, I just wing it. And then I somehow screw things up while filming. That’s what happened here. I wasn’t fully confident with the recipe but still went with it, which brings us to the real issue that I faced which delayed this post.
Apples have a lot of water in them. You have to get rid of some of that water before you put it on a tart shell. Otherwise, it turns out soggy. So, usually, “Apple Pie” recipes require you to cook the apples first before you put them in a pie dough. But this is not a “pie” recipe. The whole point of my ‘Desserts if you hate desserts’ series is to avoid overly & Unnecessarily sweet desserts. Hence, I made an apple tart, which ensures that the natural flavour of the apples is very much present. And, of course, this is not an original recipe of mine. I usually reference it online from multiple sources and do a version that works the best for me and hopefully for you. But since I was not happy with my product, I didn’t upload the recipe because that would be wrong, wouldn’t it? Thinking I will eventually fix it and do it again. That was a mistake.
Ever since I posted that recipe, a couple of people online have brought it to my notice that they couldn’t find the recipe. In the video, you can see how my tart is a bit soggy when I cut it and take it onto a plate. Another internet citizen was kind enough to notice it and give me advice on how to avoid it. And that gave me the courage to post this recipe after trying it successfully one more time. And, this time, I was satisfied with it. Although I would keep improving the recipe every single time I make it. This is a recipe that I’m confident will work well………….. I think 😉
Ingredients
- 180 gms of All-purpose flour
- 90 gms of cold Butter
- 45 gms of powdered/granulated Sugar
- 1 no Egg
- A pinch of Salt
- One cup of uncooked Rice (as baking weight)
- 4-5 medium-sized Apples
- 2-3 tbsp of powdered/granulated Sugar
- 1 no lemon wedge
- 1 tsp of Cinnamon powder
- 2-3 tbsp of melted Butter
Procedure
- Sieve the flour, sugar, and salt in a bowl. Take the butter from the fridge, and cut it into cubes.
- Rub the flour and the butter together using the tips of your fingers (to prevent the butter from melting too quickly) to a breadcrumb consistency.
- Shake the bowl, and large clumps will rise to the top. Make sure everything is evenly distributed.
- Crack the egg into a separate bowl. Remove broken shells, if any. Whisk the egg with a fork, and add it to the flour mixture. Combine to form a dough. DO NOT KNEAD.
- Mix everything by pressing from the sides. Don’t squeeze the dough. We don’t want to create any gluten.
- Bring the dough together. Wrap it in plastic wrap or put it back in the bowl with a lid. Put it in the freezer for 15 minutes.
- Take the dough out. Flour your work surface generously and roll the dough into a circular shape until it is bigger than your tart pan by a couple of inches. (Release the dough from underneath if it sticks by running it with a palette knife or spatula).
- Put your rolling pin on the top edge of your tart dough. Use the rolling pin as a support to roll the dough back onto the rolling pin and slowly move down to the bottom edge. Keep your tart pan nearby when you do this step.
- Roll the dough back onto the tart pan gently by rolling the dough from the bottom to the top. Once done, lift one edge of the pastry and press it gently into the tart case. Follow this step around the tart pan, and trim off the excess at the end. Prick the bottom of the pastry with a fork (docking) and freeze the tart for 45 minutes.
- Pre-heat your oven to 160 C. Crumple up baking/parchment paper and place it on top of the shell. Add uncooked rice as baking weight. Bake it for 15-20 mins.
- In the meantime, peel the apples. Keep them in a bowl of water to prevent browning. Cut off all the sides of the apple, leaving the core.
- Add the apple slices to a bowl and add sugar, salt, a pinch of cinnamon powder and lemon juice. Toss everything to coat it evenly and let it sit for 10-20 mins. After that, slice the apple sections thinly, and keep the sections joined together.
- Once the tart shell is baked, take it out, remove the baking paper, and sprinkle the surface evenly with granulated sugar.
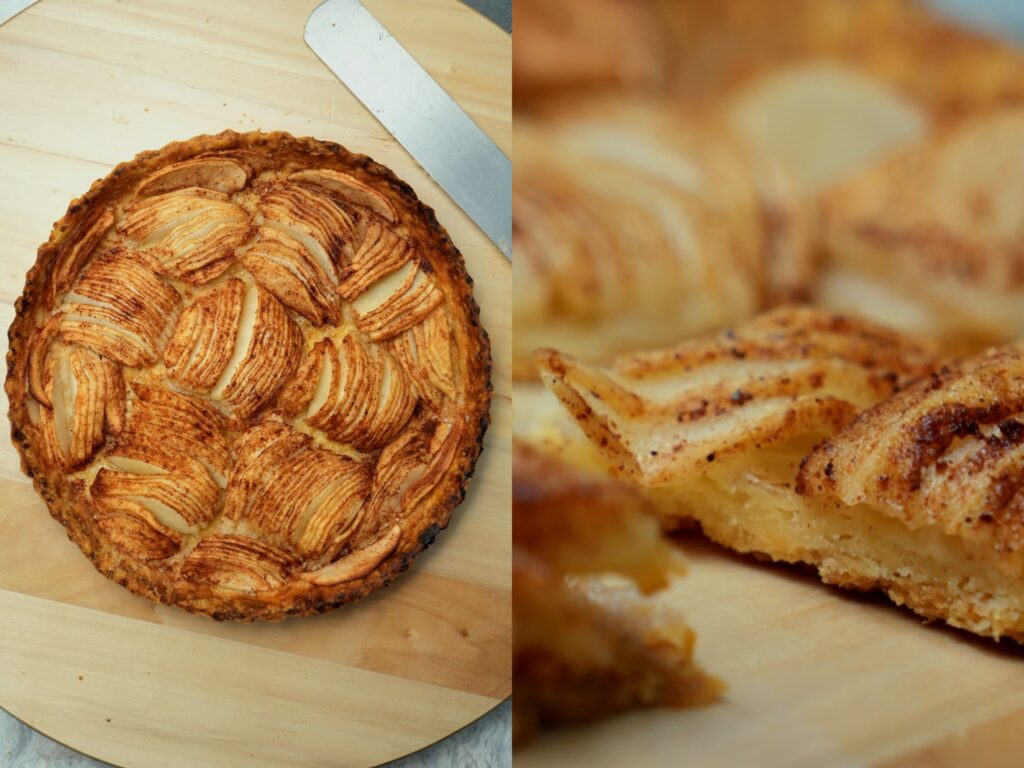
- Arrange the slices as shown in the video (alternating the pattern) or however you see fit. But make sure to really pack the tart shell with the apples. (It’ll take more than you think and will reduce in size after baking)
- Sprinkle the top of the apples with sugar and cinnamon powder, and brush generously with melted butter.
- Bake it at 180 C for 40 mins. Remove it after that and let it cool to the touch before you remove it from the tart pan.
- Cut off a slice and serve it with whipped cream, or just shove it in your face straight up!